Friday 17 March 2017

Troubleshoot connectivity problems for Retail Modern POS devices [AX 2012]


This topic explains how to troubleshoot and fix errors that occur when activating a modern point of sale (MPOS) device. To perform these tasks, a user must have access to Headquarters, must have IT Administrator rights on the computers that are running the Retail Server, Real-time Services, and the channel database, and must be assigned to a POS permission group that has device activation rights.
Permissions for a user can be modified after they have been assigned to a POS permission group in the Worker > Retail > POS Permissions form. 
Caution noteCaution
In Retail essentials, the forms that you use to complete some tasks might include only a subset of the controls that are available for other configurations of Retail. If a topic about these forms describes controls that you don't see, it may be because you’re using Retail essentials.
MPOS cannot be used with Retail essentials.

Terminal not assigned to store

  1. Go to Retail > Setup > POS > POS registers.
  2. Select the register that you are trying to activate the device for, and then on the Register tab, click Edit.
  3. Check the Store number value. If it is empty or contains the wrong store number, enter the correct value.
  4. Click Close to save your changes.
  5. Go to Retail > Periodic > Data distribution > Distribution schedule.
  6. Run job 1090 (Registers) and wait for it to finish.
  7. Activate the device again using the correct information.
  8. The device should now activate successfully.

Worker not assigned to store

  1. Go to Retail > Common > Workers.
  2. Select the worker (Operator ID) that you are trying to activate the device for and then on the Worker tab, click Edit.
  3. Check the Address Book value under Other information. If it is empty or contains the wrong address book, enter the correct value.
  4. Click Close to save your changes.
  5. Go to Retail > Common > Retail channels > Retail stores.
  6. Select the store that you are trying to activate the device for, and then on the Store tab, click Edit.
  7. Under Address book > Employee address book verify that the address book is the one the worker belongs to. If it is the wrong address book, either change to the correct address book, or assign the employee to the correct address book.
  8. Click Close to save your changes.
  9. Go to Retail > Periodic > Data distribution > Distribution schedule.
  10. Run jobs 1060 (Staff) and 1070 (Channel Configuration) and wait for them to finish.
  11. Activate the device again using the correct information.
  12. The device should now activate successfully.

Incorrect staff ID or password

  1. Go to Retail > Common > Workers.
  2. Select the worker (Operator ID) that you are trying to activate the device for and then on the Worker tab, click Edit.
  3. In the left pane, click Profile, and then check the personnel number. This should be same as the Operator ID you are trying to use for activation.
  4. In the left pane, click Retail, and then change the password.
  5. Go to Retail > Periodic > Data distribution > Distribution schedule.
  6. Run job 1060 (Staff) and wait for it to finish.
  7. Activate the device again using the correct operator ID and updated password.
  8. The device should now activate successfully.

Device already activated

  1. Click Retail > Setup > Devices.
  2. Select the number of the device that you are trying to activate.
  3. In the Activation status column, check whether the status is activated or deactivated.
  4. Change the Activation status to Pending.
  5. Activate the device again.
  6. The device should now activate successfully.

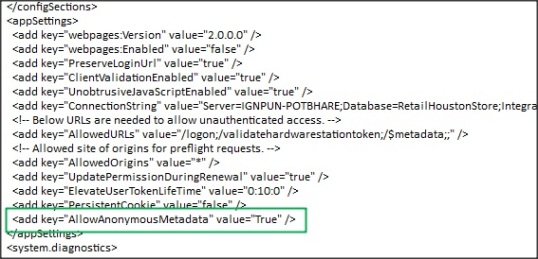
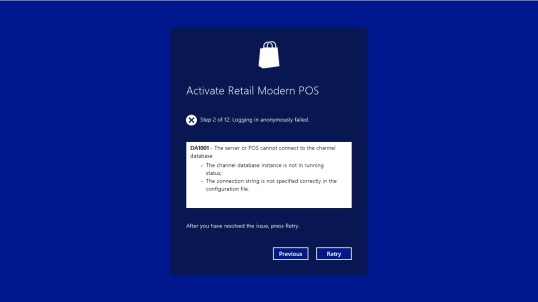
Channel database connection failed

To perform the following procedure, you must be an administrator on the Retail server computer and the Channel database computer.
In the headquarters environment, perform the following steps:
  1. Go to Retail > Setup > Retail scheduler > Channel integration > Channel database.
  2. Select the channel database ID that you are trying to connect to.
  3. On the Retail channel FastTab, validate that the server name and database name are accurate.
Log in to the computer that hosts the Retail server.
  1. Check whether the Retail server is configured to match the correct channel database.
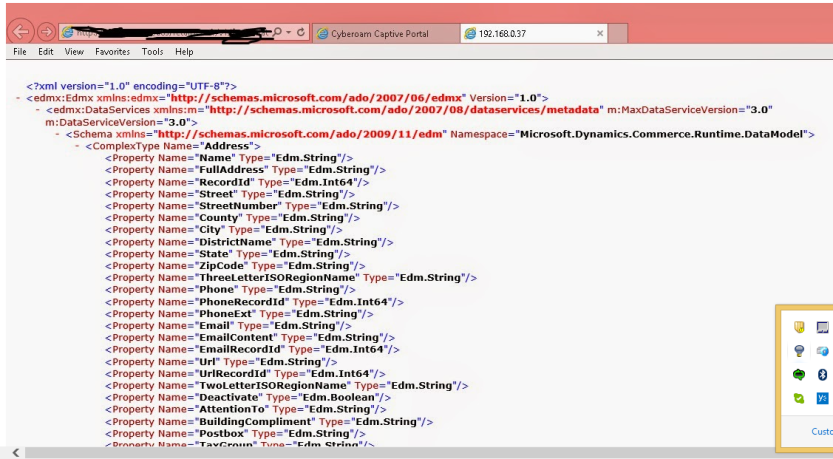
  2. Check whether the channel database ID matches the connection string of the database that you are accessing for the store where the Modern POS will be used.
If you had to modify the channel database connection string (channel database ID), you must run the Channel configuration job and reset IIS.
  1. In the channel database form (Retail > Setup > Retail Scheduler > Channel integration > Channel database), run the Channel Configuration job (1070).
  2. On the Retail server, perform an App Pool Refresh or iisreset.
  3. Activate the device again using the correct information.
  4. The device should now activate successfully.

Real-time Service connection failed

You must be a local administrator on the computers that host the Real-time Service and the Retail Server to perform these steps.
  1. Go to Retail > Setup > Parameters > Retail shared parameters.
  2. In the left pane, select General.
  3. Under the Devices section, make sure that Real-time Service profile for device activation is selected for the correct Real-time Service profile.
  4. Go to Retail > Setup > Retail scheduler > Channel integration > Real-time Service profiles.
  5. Check whether the server name is correct, and whether the common name is the subject name of your certificate.
Log in to the computer that hosts the Real-time Service.
  1. Open IIS and check whether the Real-time Service is running.
  2. Refresh the App pool or perform an iisreset.
Log in to the computer that hosts the Retail Server.
  1. If you had to change the Real-time Service URL, refresh the app pool or perform an iisreset for the Retail Server.
  2. Activate the device again using the correct information.
  3. The device should now activate successfully.

Server not responding

You must be a local administrator on the computers that host the AOS, Real-time Service, and Retail Server to perform this procedure.
  1. Validate that the AOS windows service, Real-time Service (Web service), and Retail Server (Web service) are running.
  2. Log in to the computer that hosts the Retail Server.
  3. Check that the Retail Server is configured to use the correct URL and port. This should be the same URL that you use to activate from the Modern POS device.
  4. Refresh the app pool or perform an iisreset for the Retail Server.
  5. Activate the device again using the correct information.
  6. The device should now activate successfully.

Modern POS Activation in Dynamics AX for Retail R3

Hi Guys, With the latest version Microsoft Dynamics AX 2012, Microsoft has came out with the Mobile application for Retail POS which includes Retail Modern POS, a point-of-sale app for PCs, tablets, and phones. The modern POS includes the basics around tender/transaction, but now also extends into a rich clienteling or assisted sales offering, as well as back office capabilities at the employees fingertips. The power of this new modern POS is that it becomes much more than a Point of Sale experience – it is a customer engagement dashboard! I would like to give you a brief walk-through on the installation and activation process of Modern POS. Follow below steps to install and activate Modern POS in Windows Server 2012 R2 or Windows 8.
Install Desktop Experience
Install Desktop Experience in Windows server 2012 R2
  1. Click Start, point to Administrative Tools, and then click Server Manager.
  1. In Server Manager, click Features, and then in the Server Manager Details pane, under Features Summary, click Add features.
  1. The Adding Features Wizard starts.
  1. In the Features list, select Desktop Experience, and then click Install.
Developer license
Getting a developer license at a command prompt
  • Show-WindowsDeveloperLicenseRegistration. This command opens a dialog box from which you can get a developer license and install it on the local machine. To run this command, you must have a valid Microsoft account. You also must run this command in a command prompt with elevated permissions.
  • Get-WindowsDeveloperLicense. This command returns an object that has two properties: ExpirationTime and IsValid. ExpirationTime is a System.DateTime structure that contains the date and time when the license expires. IsValid is a System.Boolean that indicates whether the license is valid. You can run this command from a command prompt that doesn’t have elevated permissions.
  • Unregister-WindowsDeveloperLicense. This command warns you that some apps will stop working if you remove the developer license from the local machine. If you choose “Yes” (the default) to confirm that you want to remove the license, the license is removed from the local machine. You must run this command in a command prompt with elevated permissions.
Configure Group Policy for side loading
  1. Open the Group Policy Management Editor
  1. Click to expand Computer Configuration, Administrative Templates, Windows Components, and then App Package Deployment.
  1. Double-click the Allow all trusted apps to install setting.
  1. In the Allow all trusted apps to install window, click Enabled and then click OK.
  1. Setting the Group Policy to allow trusted applications updates the following registry setting: HKEY_LOCAL_MACHINE\Software\Policies\Microsoft\Windows\Appx\AllowAllTrustedApps = 1
Install the prerequisites for Modern POS
  1. You can install Visual Studio Express 2013 to obtain the files, and then manually install the prerequisites for Modern POS.
  1. Download and install Visual Studio Express 2013.
  1. Copy and paste the following files to the specified locations. File1Microsoft.WinJS.2.0.appx Copy from “\Program Files (x86)\Microsoft SDKs\Windows\v8.1\ExtensionSDKs\Microsoft.WinJS.2.0\1.0To “\Program Files (x86)\Microsoft Dynamics AX\60\Retail Modern POS\x64\Dependencies\” File2Microsoft.VCLibs.x64.12.00.appx (64-bit operating systems only) Copy from “\Program Files (x86)\Microsoft SDKs\Windows\v8.1\ExtensionSDKs\Microsoft.VCLibs\12.0\AppX\Retail\x64\ “ To “\Program Files\Microsoft Dynamics AX\60\Retail Modern POS\x64\Dependencies\x64\” File3: Microsoft.VCLibs.x86.12.00.appx (32-bit operating systems only) Copy from “\Program Files (x86)\Microsoft SDKs\Windows\v8.1\ExtensionSDKs\Microsoft.VCLibs\12.0\AppX\Retail\x86\” To “\Program Files (x86)\Microsoft Dynamics AX\60\Retail Modern POS\x86\Dependencies\x86\ “
Manually install the prerequisites.
  1. Open a Windows PowerShell session as an administrator.
  1. Run the following command to install WinJS. Add-AppxPackage “:\Program Files (x86)\Microsoft Dynamics AX\60\Retail Modern POS\x64\Dependencies\Microsoft.WinJS.2.0.appx
  1. Run one of the following commands to install VCLibs. On a 64-bit operating system Add-AppxPackage “:\Program Files (x86)\Microsoft Dynamics AX\60\Retail Modern POS\x64\Dependencies\x64\Microsoft.VCLibs.x64.12.00.appx” On a 32-bit operating system: Add-AppxPackage “:\Program Files (x86)\Microsoft Dynamics AX\60\Retail Modern POS\x86\Dependencies\x86\Microsoft.VCLibs.x86.12.00.appx
Install Modern POS using Power Shell
Configuring Retail Server using Power Shell
Test the Retail Server
Modern POS Activation
 Troubleshooting MPOS
  1. User ‘000XXX’ logon request error – https://community.dynamics.com/ax/f/33/t/151213.aspx
  1. Wrong End point exception – https://community.dynamics.com/ax/f/33/t/151054.aspx
  1. Application error – If you face application error during Activation, then one of the causes can be the EFT setup in the Hardware profile. Make sure the EFT service is selected as Payment connector and the same is replicated in POS DB.
  1. User is not authorized – Allow Anonymous metadata in Web.config file for Retail server.
  1. Untitled.jpg
  1. Error at step 2 of mPOS activation – Setup the server name for the POS database in the Channel database form in DAX.Untitled.jpg

The Desktop Experience feature enables you to install a variety of Windows 8 features on your server running Windows Server 2012. If you use Windows Server 2012 as your primary operating system, you might want to have some of these Windows 8 features available for your daily use.
The desktop experience is not required to install for Windows 8 OS
In most cases, if you want to install and test an app, you must get a developer license for each machine on which you want to run the app.
If you aren’t using Visual Studio 2013, you can get and manage developer licenses at a command prompt by running these commands in Windows PowerShell.
Run Install-Retail Modern POS command through power shell to install Modern POS. Power Shell Command .\Install-RetailModernPOS.ps1 “C:\Program Files (x86)\Microsoft Dynamics AX\60\Retail Modern POS”
Retail server is very important component for Modern POS. Power Shell Command to deploy retail server – $Cred = @((New-Object System.Management.Automation.PSCredential(‘domain\aosadmin’,(ConvertTo-SecureString ‘Aos@admin123’ -AsPlainText -Force)))) .\DeployRetailServer.ps1 -SettingsXmlFilePath .\rs-settings-updated.xml -TopologyXmlFilePath .\rs-topology-updated.xml -Credential $Cred -Authentication $Cred Go to Retail server’s web.config and make sure RequireSSL setting is “false”
Run this URL on browser. http://:/RetailServer/v1/$metadata The output should be as shown below – 1
1. Start the Microsoft Dynamics AX Modern POS app. 2. In the Device Activation page, enter the URL for the Retail Server. After you enter the URL, the device is queued in the Microsoft Dynamics AX client where it must be approved. After the device has been approved, the client is ready to use.
There are many hurdles in installing and activating the MPOS. I am trying to consolidate the solutions and below are few which can help you in fixing the issues.
Hope this will help you install and activate the Modern POS. Do like the post and comment if you face any difficulty in installing the MPOS.