Wednesday 30 July 2014

Form letter classes and its hierarchy in ax 2012

One of the most commonly used classes in AX are the FormLetter classes. The
FormLetter classes define how to post different status updates against sales orders
and purchase orders.
The normal flow when a posting is being performed is that the parm tables are
Populated with data, and then the update itself is performed.
Below example will shows how to Post the Invoice from sales order, similar logic's can be used to post the Invoice from Purchase order.
static void postSalesInvoice(Args _args)
{
// Define a classvariable according to the
// type of posting being performed
SalesFormLetter_Invoice invoice;
SalesTable salesTable;
;
// Select the salesTable to update
salesTable = SalesTable::find(“SO-101297″);
// Create a new object of the SalesFormLetter_Invoice
// by using the construct-method in SalesFormLetter
invoice = SalesFormLetter::construct(DocumentStatus::Invoice);
// Post the invoice
invoice.update(salesTable,
SystemDateGet(),
SalesUpdate::All,
AccountOrder::None,
false,
true); // Set to true to print the invoice
}
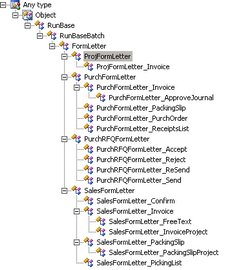
The next screenshot shows the class hierarchy of FormLetter with all its sub classes:  we can easily customize the above logic to post different status updates against sales orders
and purchase orders
Sales (Confirmation, Picking list, Packing slip, Invoice )
Purch (Purchase order,Receipt list, Packing slip, Invoice)
Image

Monday 14 July 2014

Version Control System in AX

A Version Control System (VCS) enables a team of developers to work, at the same time, on the code base in one or more projects. Using a VCS can have the following advantages, depending on which VCS you use:
  • Concurrent development
  • Isolated development
  • Change description
  • Change history
  • Change list support
  • Quality bar enforcement
MorphX, the Microsoft Dynamics AX Integrated Development Environment (IDE), can integrate various Version Control Systems (VCS). You can integrate:
  • Microsoft Visual Studio Team Foundation Server (TFS)
  • Microsoft Visual SourceSafe
  • MorphX VCS
  • Another third-party VCS
Version Control Considerations

If you use the VSS or TFS version control systems, you should consider the following before you develop code or write documentation:
  • Version control is file-based.
  • You must install Microsoft Visual Studio or Microsoft Visual Studio Team Explorer.
  • Each developer must have an Application Object Server (AOS) and database server.
MorphX VCS allows for out-of-the-box version control system integration. MorphX VCS is intended for one to ten developers who use a shared AOS. Instead of checking out objects and storing them in a repository, MorphX VCS signals to other users that a specific element is being worked on by another user. It provides change description functionality, change history functionality, and quality bar enforcement.


Microsoft Dynamics AX can integrate with VSS, TFS, and MorphX VCS, but you can extend the version control functionality to use other version control systems.

The following table compares the features available from the different version control options:
MorphX
MorphX VCS
Visual SourceSafe
TFS
Concurrent development
No
No
Yes
Yes
Isolated development
No
No
Yes
Yes
Change description
No
Yes
Yes
Yes
Change history
No
Yes
Yes
Yes
Quality bar enforcement
No
Yes
Yes
Yes
Branching
No
No
No
Yes
Work item integration
No
No
No
Yes
Labeling support
No
No
Yes
No

To add Elements to the version control system


  1. In the AOT, right-click the element and then click Add to Version Control.
  2. After you check in the element, it can be checked out of the version control system.

After you check in the element, it can be checked out of the version control system.
The element is added to the current model. The current model and layer are displayed in the status bar in Microsoft Dynamics AX and may also be displayed together with the element in the AOT.
You cannot have two models under version control in the same layer if elements occur in both models. You must develop outside of version control when this is the scenario. For example, during upgrade you might have fields that occur in the original table and the upgrade table.
If you add an element in a lower layer to version control and then customize the element in a higher layer, you may encounter problems when you synchronize. If you develop in multiple layers, we recommend that you create separate VCS branches for each layer.
If you cannot check in a new element, it might have failed some of the quality checks set in the system settings for the version control system. These settings are typically chosen by an administrator, and are set in the System settings form.

Checking Out and Checking in the Label File

Create or edit labels by using the Label editor. When you create a new label, a temporary label ID is assigned to it.

To add a label file to version control

  1. Click Tools > Label > Label editor.
  2. Click Add to version control.

To check out the label file

  1. Click Tools > Label > Label editor.
  2. Click Check out.
When finished, check the label file back in. When you check in a new label, the temporary label ID and references to it are mapped to a globally unique label ID.

To check in the label file

  1. On the Label editor form, click Check in.
  2. Type a description of the work you completed, and then click OK.


Resolving References to a Temporary Label ID that is Not Valid

If you have references to a temporary label ID that has already been checked in, those references are not valid because the temporary label ID is replaced with a globally unique label ID when you check it in. This can happen when references to the temporary label ID are not in the scope of the check-in.

To resolve references to temporary labels

  1. Manually locate references to a temporary label ID that should reference the new globally unique label ID.
  2. Update the references to point to the new globally unique label ID.

To check out an element from the AOT

  • In the AOT, right-click the element, and then click Check Out.
The Check Out command synchronizes the local copy with the version control system copy before checking it out. You can select multiple items in the AOT and check them out in one step.