Thursday, 19 January 2017

Forms on opening hide behind in the back

In Dynamics AX 2012, when you open the forms,  you might see some of them open behind the other forms. User may get the impression that the form was never opened.  This happens if the form opened slowly;  a cold start, uniqueness of the data including large number of records or complexity of the form may cause the form to load up slowly.  The form hide behind the other form because of Windows’s ‘ForegroundLockTimeout’.
Doing the following changes to your system could fix this issue.  Since it involves changing a registry key in your system, take necessary precautions.
Create a Restore point before performing the steps below as a precaution.
Steps:
1. Open registry>> Start>>Type regedit>>press enter.
2. Locate the key:
HKEY_CURRENT_USER\Control Panel\Desktop
3. On the right pane right click on the following key and select modify:
4. ForegroundLockTimeout
5. Select Base as decimal and then type 0 (zero) in the value data box and click on Ok.
6. Exit from registry and restart the computer.
REGISTRY EDIT DISCLAIMER:
Important This section, method, or task contains steps that tell you how to modify the registry. However, serious problems might occur if you modify the registry incorrectly. Therefore, make sure that you follow these steps carefully. For added protection, back up the registry before you modify it. Then, you can restore the registry if a problem occurs. For more information about how to back up and restore the registry, click the following article number to view the article in the Microsoft Knowledge Base:
322756 How to back up and restore the registry in Windows

Thursday, 6 October 2016

Connecting Dynamics AX to a Specific AOS Instance

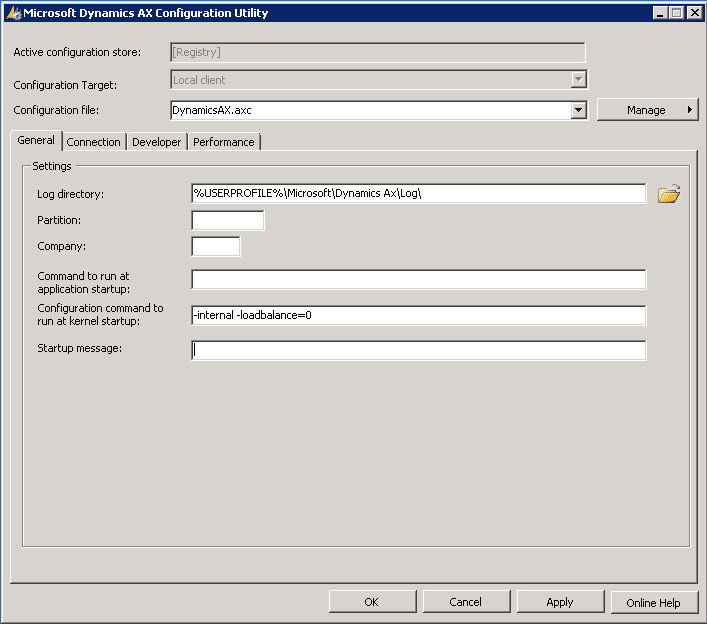
When working in a Dynamics AX environment with multiple AOS instances there are times when you want to connect an AX client to a specific AOS for troubleshooting and/or testing purposes.   To bypass any load balancing create a client configuration file set up to connect to a specific AOS instance using a configuration command setting.
  1. Create a new AX Client Configuration file using the Microsoft Dynamics AX Configuration Utility.
  2. In the “Configuration command to run at kernel startup” field enter the following command
    1. -internal -loadbalance=0
  3. Save the file.
  4. Launch Dynamics AX using this new file.
When using this configuration file to launch Dynamics AX it will connect to the AOS instance that you have configured under the Connection tab and bypass any AX load balancing that is set up.

AX Configuration Utility

Wednesday, 10 February 2016

Sequence of methods in form and table in AX

Form:
Sequence of Methods calls while opening the Form
Form — init ()
Form — Datasource — init ()
Form — run ()
Form — Datasource — execute Query ()
Form — Datasource — active ()
Sequence of Methods calls while closing the Form
Form — canClose ()
Form — close ()
Sequence of Methods calls while creating the record in the Form
Form — Datasource — create ()
Form — Datasource — initValue ()
Table — initValue ()
Form — Datasource — active ()
Sequence of Method calls while saving the record in the Form
Form — Datasource — ValidateWrite ()
Table — ValidateWrite ()
Form — Datasource — write ()
Table — insert ()
Sequence of Method calls while deleting the record in the Form
Form — Datasource — validatedelete ()
Table — validatedelete ()
Table — delete ()
Form — Datasource — active ()
Sequence of Methods calls while modifying the fields in the Form
Table — validateField ()
Table — modifiedField ()

Table:
When you press CTR+N
initValue()->

When you change data in a field
validateField() -> validateFieldValue() -> ModifiedField() -> ModifiedFieldValue()

When you close the table after entering some data
validateWrite() – > Insert() -> aosValidateInsert()

When you Save the Record for the first time
validateWrite() ->Insert() – > aosValidateInsert()

When you modify the record and saving
validateWrite() -> update() – > aosValidateUpdate()

When you delete the record
validateDelete() -> delete() -> aosValidateDelete()

Monday, 21 September 2015

Dynamics AX Async Server Installation and configuration

Hi Folks,

Before we start with our new assignment of installation and configuration of of Async Server.  We need to keep few things into consideration which are as follows:

1. Set-ExecutionPolicy : The Set-ExecutionPolicy cmdlet enables you to determine which Windows PowerShell scripts (if any) will be allowed to run on your computer. Windows PowerShell has four different execution policies:
  • Restricted - No scripts can be run. Windows PowerShell can be used only in interactive mode.
  • AllSigned - Only scripts signed by a trusted publisher can be run.
  • RemoteSigned - Downloaded scripts must be signed by a trusted publisher before they can be run.
  • Unrestricted - No restrictions; all Windows PowerShell scripts can be run.
Command for Setting : Set-ExecutionPolicy Unrestricted

2. Check IIS is installed and in working Condition.
3. Check you are using Service Account for the installation of Async Server
5. Create a Self signed certificate of enterprise certificate in server where you are installing Async Server.

Now start with installation Part

Install the Async Server From Dynamics AX 2012 R3 Media

  1. Start Microsoft Dynamics AX Setup. Under Install, select Microsoft Dynamics AX components.
  2. Advance through the first wizard pages.
  3. If the Setup Support files have not yet been installed on this computer, the Select a file location page is displayed. The Setup Support files are required for installation. Provide a file location or accept the default location, and then click Next. On the Ready to install page, click Install.
  4. On the Select an installation option page, click Microsoft Dynamics AX.
  5. On the Select installation type page, click Custom installation, and then click Next.
  6. On the Select components page, select Async Server, and then click Next.
  7. On the Prerequisite validation results page, resolve any errors. For more information about how to resolve prerequisite errors, see Check prerequisites. When no errors remain, click Next.
  8. On the Configure Async Server page, select the check box to configure Async Server by using Setup. If you clear this check box, the application files are installed, but Async Server is not configured.
    If you’re configuring Async Server, enter the following information:
    • Application name – The name of the web application that hosts Async Server.
    • App pool name – The name of the application pool that the web application runs under.
      We recommend that you specify separate application pools if multiple Retail components are installed on the same computer. Multiple web applications can share an application pool if resources on the computer are limited. However, if the shared application pool fails, all of the applications that use it will stop responding. In addition, if one application is heavily used, it can negatively affect the performance of the other applications in the pool.
    • Website name – The name of the website that Async Server runs on.
    • User name and Password– The credentials for the application pool identity.
    • HTTPS port – The port on which Async Server receives HTTPS requests. You can specify any available port. Verify that the port is open in Windows Firewall, and record the port number. The port is used to create the URL for Async Server in the following format: https://<server name>:port/<web application name>. This URL is required when you configure instances of Async Client that connect to this instance of Async Server.
    • TCP port (optional) – The port on which Async Server receives TCP requests. Specify a TCP port if your environment uses high-performance data synchronization. You can specify any available port. Verify that the port is open in Windows Firewall.
    • AOS service user – The user account that the instance of Microsoft Dynamics AX Application Object Server (AOS) runs as.
    • SSL certificate thumbprint – The thumbprint for the Secure Sockets Layer (SSL) encryption certificate. You must obtain a valid, registered certificate from a provider.
  9. On the Select a database to use with Async Server page, create a new message database for Async Server. If you install a subsequent instance of Async Server for load balancing, you must select the same message database.
  10. On the Prerequisite validation results page, resolve any errors. For more information about how to resolve prerequisite errors, see Check prerequisites. When no errors remain, click Next.
  11. On the Ready to install page, click Install.
  12. After the installation is completed, click Finish to close the wizard.
If you don't want to configure the Async Server at the time of installation then you can do it manully through PowerShell
  1. Open the folder where the Windows PowerShell scripts are installed. By default, the files are located at C:\Program Files (x86)\Microsoft Dynamics AX\60\CDX\Async Server\Tools.
  2. Create a copy of the ss-settings.xml file for each instance of Async Server that you plan to deploy. We recommend that you not change the original file.
  3. Open your copy of the ss-settings.xml file in a text editor, such as Notepad. Change the parameter in the XML File.
  4. Save the changes.
  5. Open Powershell in the Administrator mode.
  6. Enter the command:  $Cred = @((New-Object System.Management.Automation.PSCredential('domain\user', (ConvertTo-SecureString 'password' -AsPlainText -Force))))
  7. Enter the edited  configuration Command :  .\DeployAsyncServer.ps1 -TopologyXmlFilePath $topologyFileName -SettingsXmlFilePath $updatedSettingsFileName -Credentials $Cred                                                                     such as Example:
    .\DeployAsyncServer.ps1 -SettingsXmlFilePath “C:\Program Files (x86)\Microsoft Dynamics AX\60\CDX\Async Server\Tools\ss-settings.xml” -TopologyXmlFilePath “C:\Program Files (x86)\Microsoft Dynamics AX\60\CDX\Async Server\Tools\ss-topology.xml” -Credentials $Cred –Verbose $true
After you configure check the services through open the url which is generated at the IIS in my case lets say 
https://nishant:8105/nishantAsync/Uploadservice.svc
format:
Https://Servername:PortNumber/AsyncInstanceName/UploadService.Svc

if the page is without error that means you are done.

Happy Daxing !!!!!


How to get the list of Fields From SQL Table

SELECT
    c.name 'Column Name',
    t.Name 'Data type',
    c.max_length 'Max Length',
    c.precision ,
    c.scale ,
    c.is_nullable,
    ISNULL(i.is_primary_key, 0) 'Primary Key'
FROM  
    sys.columns c
INNER JOIN
    sys.types t ON c.user_type_id = t.user_type_id
LEFT OUTER JOIN
    sys.index_columns ic ON ic.object_id = c.object_id AND ic.column_id = c.column_id
LEFT OUTER JOIN
    sys.indexes i ON ic.object_id = i.object_id AND ic.index_id = i.index_id
WHERE
    c.object_id = OBJECT_ID('XXXX TableName')

Thursday, 13 August 2015

Get Layer code from AXC File

Many time you have come across this situation where you have been given a development environment but you are not known about development code because of your client business policies.

Today i will tell you to how you can know about development code.
1. Go to Microsoft Dynamics AX Client Configuration.
2. Select the configuration
3. manage to export the configuration file to export to your local computer.
4. open the file as Text file.

In Client Configuration Development code can be viewed in encrypted form

5. search for "aol,text" in the axc file              aol,Text,<<Layer>>
6. Search for "aolcode,Text"        aolcode,Text,<<Development Code for the above founded layer>>

Saturday, 21 March 2015

Ax 2012 Metadata artificats


There are three artifact types that enable the sharing of Microsoft Dynamics AX metadata between environments: XPO files, model files, and model store files.

>XPO files are development artifacts. They are typically used to move metadata between development environments.
> Model files are deployment artifacts and are the recommended vehicle for distributing solutions to customers, and for deploying builds on a test or staging environment.
>Model store files contain the metadata of your entire application, including element IDs and all other element metadata. Model store files are recommended when you deploy a solution from a staging environment to a production environment. When using model store files, you must maintain common element IDs between the source and target systems, as described later in this document.


The following table describes features of these three artifact types.

XPO files
Model files
Model store files
Installation tool
Microsoft MorphX
AXUtil.exe or Windows PowerShell cmdlets
The files can be uninstalled.
No, but elements can be individually deleted.
Yes
No
The files can be signed.
No
Yes
No
Element IDs are preserved in the target model store.
All elements that already exist in the model store preserve their IDs (XPO files don’t contain IDs). For new elements, new IDs are generated.
All elements that already exist in the model store preserve their IDs. For new elements, new IDs are generated.
All element IDs on the target system become equal to the IDs stored in the model store file.
Compilation is required after installation.
Yes
Yes
No
CIL generation is required after installation.
Yes
Yes
No